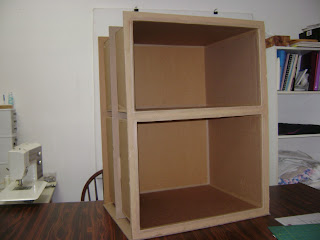
When I stopped working on my breakfast bar (back before Christmas rush) I had just finished putting the walls on the inside of the second section. As you can see, the outside walls need to be attached.
This is what the inside walls look like from the side. The gap you see is where the inside struts are located. I first cut a piece to be the bottom. Glued it on by turning the piece upside down, glue the struts, then lay the bottom piece on and weight it until the glue dried. I repeated this for the sides and the top piece.
You will notice I had a little extra lip on the bottom piece. This was to allow for the thickness of the side piece. The side piece is 1/4 inch thick so the lip is 1/4 inch.
I also cut one of the sides too short. This was easily fixable by simply adding in an extra piece. I decided to add a top on this section as well. When I designed the breakfast bar, the counter top was to be one whole piece over all the sections. Each section was to be topless except for the counter top.
I've decided to change the design and make each section as a stand alone piece but I will also make a one piece counter top to cover all the sections too. The reason I'm doing the sections differently than the way originally designed is just in case I want to change a section later. I plan to make the breakfast bar so I can remove one section and replace it with a different one. The piece I remove can be used in another area of the house without more work.
Now all the walls and top and bottom of this section are assembled. Time for adding the tape on all the joins. The tape will cover all the open flutes and give the whole piece strength.
Before adding the tape I did a little clean up on all the joined areas. I want the edges (corners) on the outside to be as straight as I can get them. As near like wood edges as possible. In some places I use a craft knife to cut some off.
For where I had cut the side piece too short and added another piece, I covered the join with craft tape. This covers the gap and will not be noticeable when the piece is finished.
On some joins (outside corners) I used a wood rasp to smooth it. It was just a tiny bit too large on one side. There was not enough to cut with a craft knife so the rasp took care of it. Use the wood rasp very lightly until you get a feel for it.
When putting tape over the open flutes of the joins you will need to deal with the corners too. I put tape on the join going an inch or so beyond the end.
Clip the middle up to the cardboard.
Glue one side down.
Then glue down the other side.
Underneath it looks like this.
Sometimes the paper tape doesn't want to stay down. It curls up as it dries but adding more water will not make it stick. This is caused by the coating on the cardboard that's applied during the manufacturing process.
I simply use a little wall paper paste on the tape and smooth it down.
Some might be tempted to use other types of tape, like masking tape or self sticking packaging tape, but those won't work. The water based packing tape is the only type tape I've found will stick to the cardboard permanently. As you can see, even the water based tape has a hard time staying in some areas.
I buy my water based packaging tape from an office supply store. The rolls I bought were about $12 for a roll that's 3" wide. I forget how many yards were on the roll but it was a lot. It's been a few years since I bought mine. I pull off a few yards, fold, and cut into three 1" strips using my rotary cutter.
If you are unable to find this water based tape anywhere, you can substitute narrow strips of paper and wall paper paste but the joins will not have as much holding strength as the packaging tape. Use a thicker paper, (magazine cover thickness) or tape twice.


1 comment:
This is looking Great! I know that typing such detailed information takes a lot of time, but it is worth it for the reader. I HAD wondered about using masking tape but now I know it won't work so you have saved me a huge headache! Thank you for the hint about using the wood rasp slowly at first because I would have charged in.
There is so much information here. I really appreciate the time and effort to get it all down for us!!
Post a Comment